Smart Contract deployment via Python (mxpy)
Let's deploy our smart contract on the blockchain. For this, we will use mxpy tools previously installed.
We will deploy the adder contract from the previous section.
In the repo there is a folder named interaction.
Let's inspect the testnet.snippets.sh file:
ALICE="${USERS}/alice.pem"
ADDRESS=$(mxpy data load --key=address-testnet)
PROJECT="../output/adder.wasm"
DEPLOY_TRANSACTION=$(mxpy data load --key=deployTransaction-testnet)
PROXY=https://testnet-api.multiversx.com

deploy() {
    mxpy --verbose contract deploy --bytecode=${PROJECT} --pem=${ALICE} --arguments 0 --send --outfile="deploy-testnet.interaction.json" --proxy=${PROXY} || return

    TRANSACTION=$(mxpy data parse --file="deploy-testnet.interaction.json" --expression="data['emittedTransactionHash']")
    ADDRESS=$(mxpy data parse --file="deploy-testnet.interaction.json" --expression="data['contractAddress']")

    mxpy data store --key=address-testnet --value=${ADDRESS}
    mxpy data store --key=deployTransaction-testnet --value=${TRANSACTION}

    echo ""
    echo "Smart contract address: ${ADDRESS}"
}

add() {
    read -p "Enter number: " NUMBER
    mxpy --verbose contract call ${ADDRESS} --pem=${ALICE} --function="add" --arguments ${NUMBER} --send --proxy=${PROXY}
}

getSum() {
    mxpy --verbose contract query ${ADDRESS} --function="getSum" --proxy=${PROXY}
}
This file helps us to easily make deployment and transactions on the blockchain.
First, let's modify the ALICE variable and put our own pem file.
After that use source command or . in bash to interpret the file:
adder/interaction$ . testnet.snippets.sh
This will load all the variables and functions in the environment.
Now we can call the deploy function:
adder/interaction$ deploy
Below is the output of the command:
INFO     cli.contracts: Contract address: erd1qqqqqqqqqqqqqpgq2yezuywz09j300reqsj3yvqn7lthv270d8sszpql8z
INFO     utils: View this contract address in the MultiversX Explorer:
         https://testnet-explorer.multiversx.com/accounts/erd1qqqqqqqqqqqqqpgq2yezuywz09j300reqsj3yvqn7lthv270d8sszpql8z
INFO     utils: View this transaction in the MultiversX Explorer:
         https://testnet-explorer.multiversx.com/transactions/eef88935d0bfcb5bb07c1f00159ff7e93c8b30812c4f0841306de42951c6c004
WARNING  cli.data: Never use this command to store sensitive information! Data is unencrypted.
INFO     cli.data: Data has been stored at key = 'address-testnet', in partition = '*'.
WARNING  cli.data: Never use this command to store sensitive information! Data is unencrypted.
INFO     cli.data: Data has been stored at key = 'deployTransaction-testnet', in partition = '*'.

Smart contract address: erd1qqqqqqqqqqqqqpgq2yezuywz09j300reqsj3yvqn7lthv270d8sszpql8z
Now we have performed a deployment of the wasm binary (our adder contract) in the blockchain.
Notice the MultiversX Explorer: https://testnet-explorer.multiversx.com/transactions/eef88935d0bfcb5bb07c1f00159ff7e93c8b30812c4f0841306de42951c6c004. Click on the link to see your transaction.
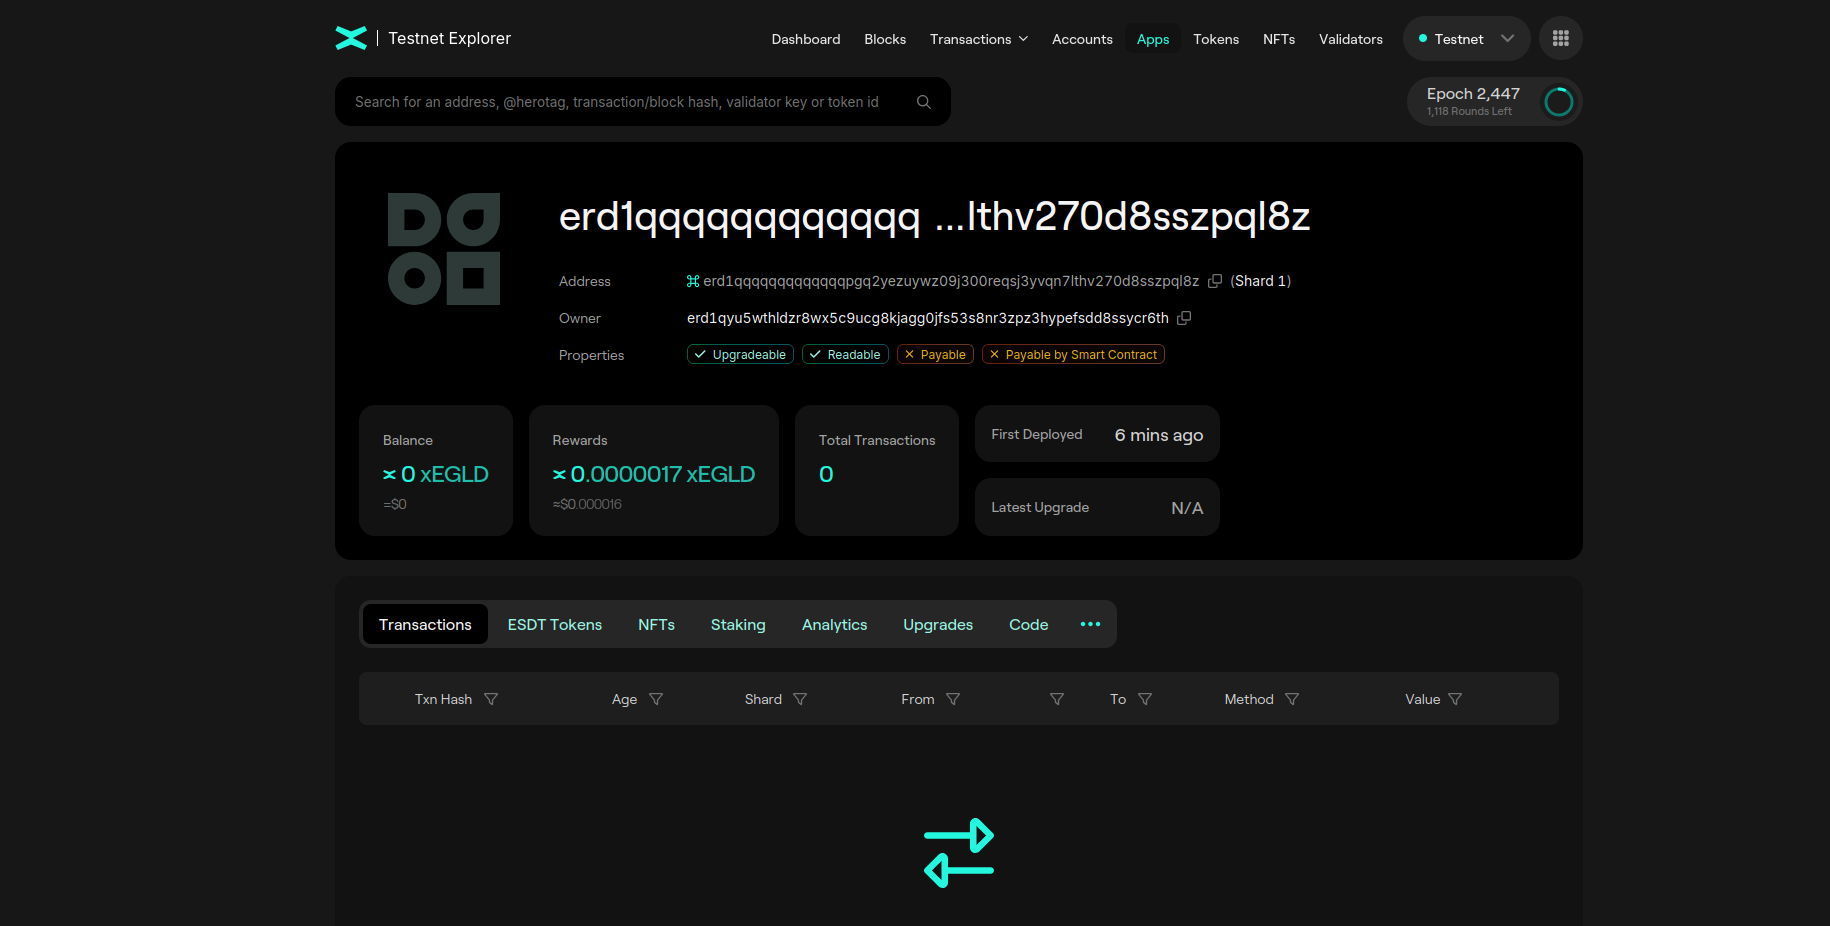
Notice the Smart contract address: erd1qqqqqqqqqqqqqpgq2yezuywz09j300reqsj3yvqn7lthv270d8sszpql8z. Go to the Testnet Explorer and search for your SC address.
Notice the contract deployed on testnet:

Observe the field Owner.